Test runner for Robot Framework Test cases
Utility
To simplify test creation, improve maintainability and generate detailed reports users can run test cases with MTF using Robot Framework.
Description
Robot Framework is an automation framework driven by keywords (single test steps), built in the Python programming language. It is designed for various purposes, including acceptance testing, acceptance test-driven development (ATTD), behavior-driven development (BDD) and robotic process automation (RPA).
Prerequisites
Python 3.9
A suitable IDE for Robot Framework such as:
TECHNICA-IDE: Technica test editor, which is a robot framework editor based on Eclipse IDE. Check the TECHNICA-IDE section for more information.
Robot Framework installation
Using the installer
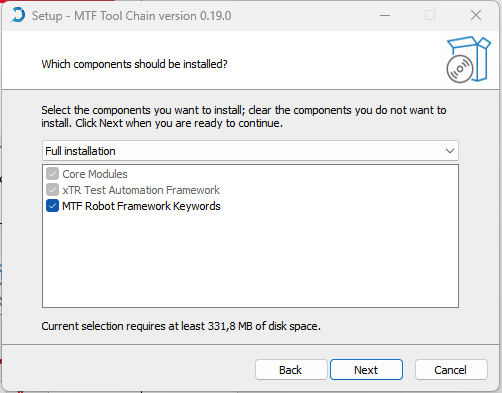
For more information about the MTF installation using the installer check this section MTF toolchain installation for Windows.
Important
There are two types of keywords: standard keywords provided by Robot Framework and special-purpose keywords, such as TechnicaKeyWords, which are implemented to invoke functions and features within the MTF toolchain.
To explore the functionalities provided by TechnicaKeyWords, refer to this section TechnicaKeyWords API.
Using pip
Internal users can also install the Robot Framework using this command:
pip install robotframework=='version'
--extra-index-url https://nexus.technica-engineering.net/repository/pypi-public/simple
--force-reinstall
It is also possible to use Python executable path -m:
python.exe -m pip install robotframework=='version'
--extra-index-url https://nexus.technica-engineering.net/repository/pypi-public/simple
--force-reinstall
Robot project creation
Recommended project structure
The path schema below shows the recommended project structure:
Project_directory
 |-- Keywords
 |    |-- Project_keywords (optional)
 |         |-- ...
 |-- Test_cases
 |    |-- Test_Suite1
 |         |-- Test_Case1.robot
 |         |-- Test_Case2.robot
 |    |-- Test_Suite2
 |         |-- ...
 |    |-- __init__.robot
 |-- Tutorials (optional)
 |    |-- ...
 |-- Test_Configuration
 |    |-- DUT_configuration (Device Under Test)
 |    |-- Project_configuration
 |    |-- Test_bench_configuration
 |    |    |-- Test_bench_Name
 |    |         |-- Test_bench_Config.yaml
 |    |-- Variable
 |         |-- values.resource
 |-- launch.json
Keywords: series of operations, specified by keywords, that simulates a user action or define a common test logic (test Steps).
Project_keywords: specific keywords and steps (Test logic) per domain.
Test_cases: Robot Test repository split by Test module.
Tutorials: Some Robot data-driven test to define test guideline.
Test_configuration: Needed Test data or Configuration files for test cases execution.
DUT_configuration: Device under test configuration.
Project_configuration: Needed config file for test case creation and execution mode: Simulation configuration, environment config and more.
Test_bench_configuration: Channel mapping and Diag configuration for test benches needed for test cases execution.
Variable: Needed test Data.
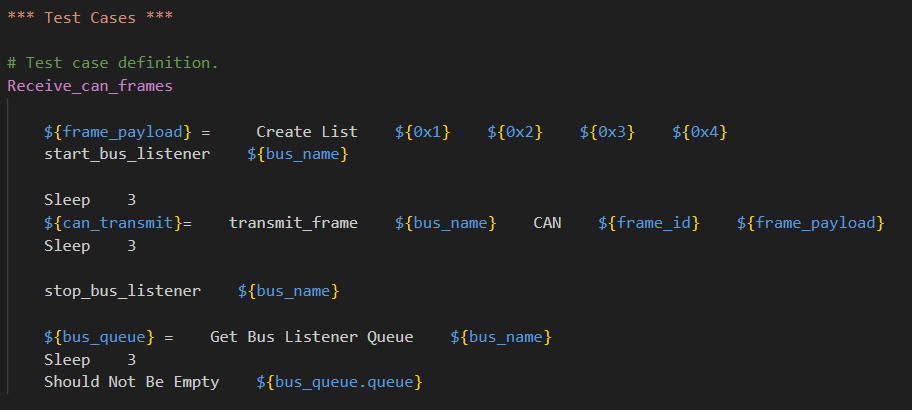
Test case structure
A test case in Robot Framework follows a structured format designed to be easily maintainable. It typically consists of the following sections:
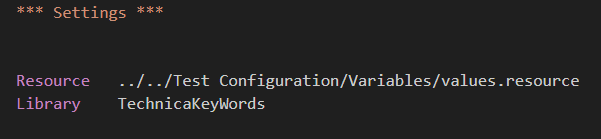
Settings section
This section specifies the test case’s settings and configurations. It includes information such as the documentation and settings for the test case execution.
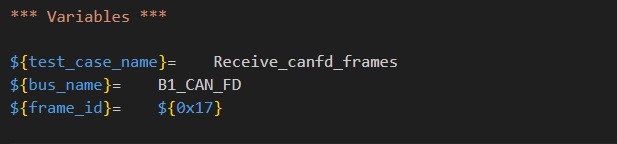
Variables section (optional)
In this section, you can define variables that your test case will use. These variables are set at the test case level.
Test steps section
This is the core of the test case, where you define the sequence of test steps using keywords. You can use built-in keywords, user-defined keywords or combination of both to perform instructions and verifications.
Keyword definition
Keyword sections enable the creation of new, more advanced keywords by combining existing ones. These are known as ‘user Keywords’ to distinguish them from the basic library keywords found in test libraries.
The syntax for creating user keywords closely resembles that of crafting test cases, simplifying the learning process.
Naming Convention
Make keyword names descriptive and straightforward.
For multiple-word keywords:
Use a single space to separate words.
Begin each word with a capital letter.
Ensure that the keyword name clearly defines its purpose.
Maintain a high level of abstraction.
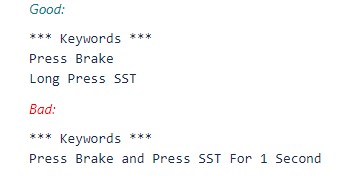
Avoid composite steps in keyword definitions.
This image below gives an example of both good and poor practices:
Structure
User keywords can include similar settings as test cases, and they are structured with square brackets to set them apart from keywords names. Here is a list of all the available settings:
[Documentation] Used to provide documentation for a user keyword.
[Tags] Assigns tags to the keyword for filtering test cases in the Report execution and keyword documentation.
[Arguments] Defines user keyword arguments.
[Return] Specifies the return value for a user keyword.
[Teardown] Specify the user keyword teardown.
[Timeout] Sets a possible timeout for the user keyword.

Best Practices
Whenever possible, use parameters to maintain a high level of abstraction.
Include a brief description of what each keyword does within a [Documentation] block.
If your keyword includes arguments, provide meaningful names for each one, and describe these arguments in the [Documentation] block.
If you work with dynamic arguments, document all possible inputs in the [Documentation] block.
When using OS environment variables to customize framework parameters, use the prefix “ENV_MTF_”. This applies regardless of whether it is used in MTF, Python or Robot Framework. See the following examples:
ENV_MTF_CONSOLE_LOG_LEVEL → log level for the console in mtf.
ENV_MTF_LOG_LEVEL → log level for the log file.
Test case execution
The user has the option to execute test cases either through the command line or by using TECHNICA-IDE the Technica test editor.
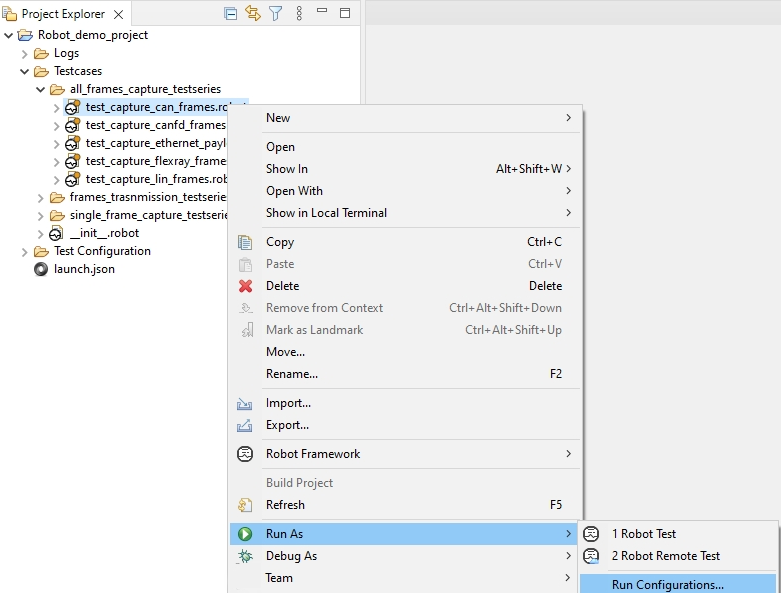
Execution with TECHNICA-IDE
To successfully execute test cases with TECHNICA-IDE, first you have to set up your Robot project following this guide TECHNICA-IDE Setup and Update. Then follow these steps:
Right-click on one of the test cases to execute, click ‘Run As’ and then click ‘Run configuration’.
This action will open the configuration panel. Next, click on the ‘Browse’ button on the right.
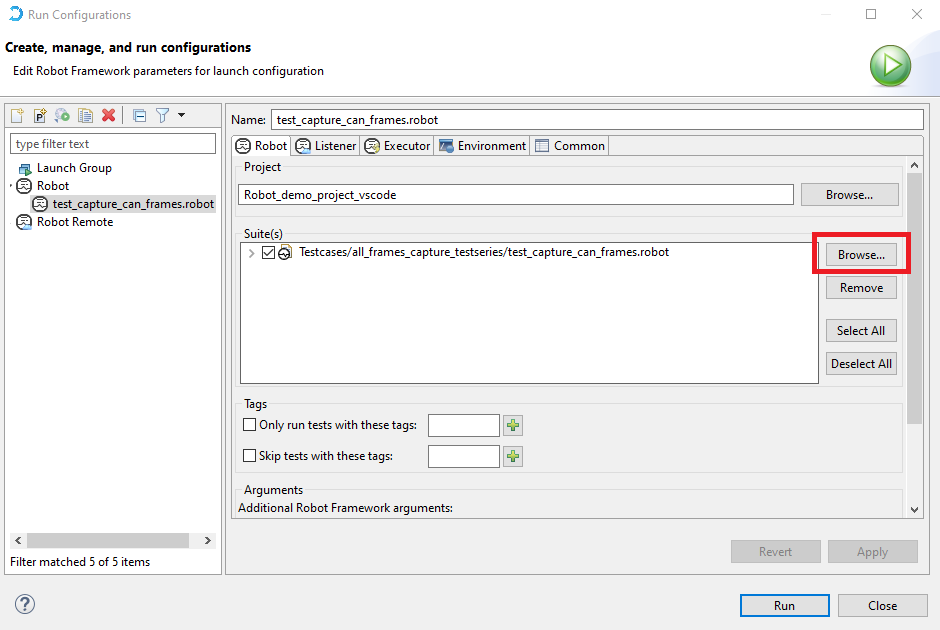
Afterward, select all the test cases you want to execute, and then click on ‘Ok’.
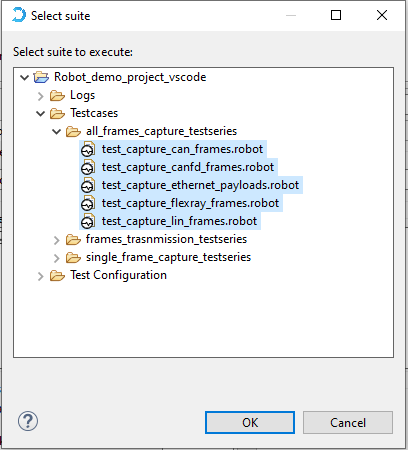
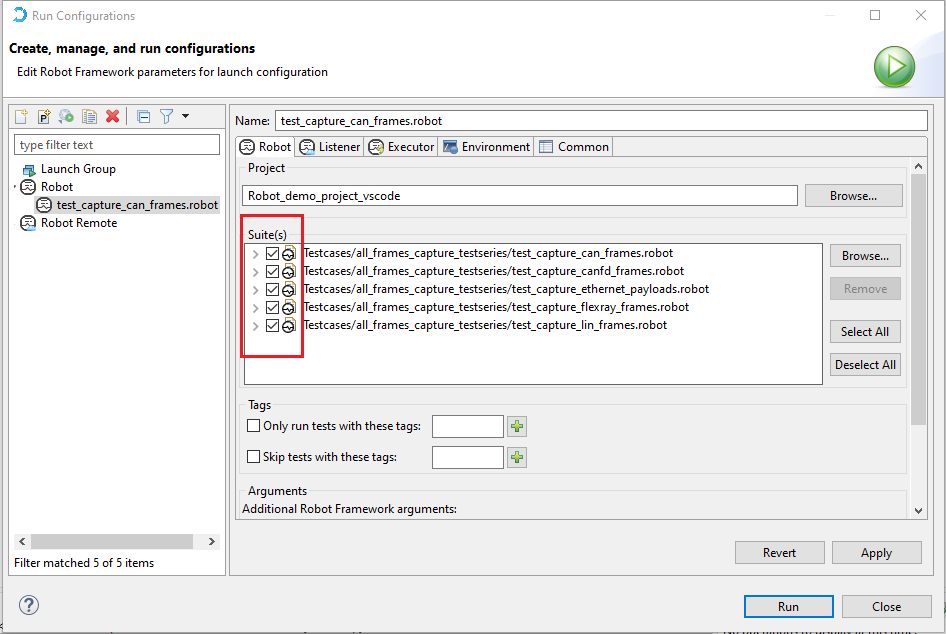
Finally, verify the selected test cases and click on ‘Run’ to initiate the execution.
Important
All generated output after the test cases execution are stored in the project directory. Refer to the Test results section for more details regarding the various generated outputs, their location and their contents.
Execution with command line
General command structure
Robot Framework test cases can also be executed from the command line and the execution can be started using the robot command created as part of installation.
This command assumes that you have the Robot Framework installed on your system and that the ‘robot’ executable is in your system’s PATH.
robot [options] data
Alternatively it is possible to execute the installed robot module using the selected Python interpreter. This is convenient if your system has multiple Python versions installed, and you want to use a specific one for testing. It is a more reliable and common way to run Robot Framework tests.
python -m robot [options] data
Finally, if you know where the installed robot directory exists, it can be executed using Python as well.
python path/to/robot/ [options] data
Note
Overall, all three commands achieve the same goal of executing Robot Framework tests, but they provide different ways to do so depending on your specific requirements and environment.
Regardless of the execution approach, the path(s) to the test data to be executed is given as an argument after the command.
Test data to be executed
Since test cases are executed by giving the path to the file or directory in question to the selected runner script, the path can be absolute or, more commonly, relative to the directory where tests are executed from.
# Executes all test cases within the 'tests.robot' file
# located in the current working directory.
robot tests.robot

# Executes all test cases in all .robot files
# within 'my_tests' directory (using a relative path).
robot path/to/my_tests/*.robot

# Executes all test cases within the 'tests.robot' file (using an absolute path).
robot c:\robot\tests.robot
Command line options
Robot Framework provides a number of command line options that can be used to control how test cases are executed and what outputs are generated. When options are used, they must always be given between the runner script and the data sources. For example:
robot -L debug my_tests.robot
robot --include smoke --variable HOST:10.0.0.42 path/to/tests/
Short name |
Long name |
Functionality |
-N name
|
–name name |
Set the name of the top level suite.
By default the name is created
based on the executed file or directory.
|
-t name *
|
–test name * |
Select tests by name or by long name containing also
parent suite name like Parent.Test.
Name is case and space insensitive
and it can also be a simple
pattern where * matches anything, ? matches any
single character, and [chars]
matches one character in brackets.
|
-s - name
|
-suite name |
Select suites by name.
Name can be a simple pattern
similarly as with –test
and it can contain parent name
separated with a dot.
For example, -s X.Y selects suite Y
only if its parent is X.
|
-i tag *
|
–include tag * |
Select tests by tag.
Similarly as name with –test,
tag is case and space insensitive
and it is possible to use patterns with
*, ? and [ ] as wildcards.
Tags and patterns can also be combined together with
AND, OR, and NOT operators.
Examples:
–include foo –include bar*
–include fooANDbar*
|
-e tag *
|
–exclude tag * |
Select test cases not to run by tag.
Tags are matched using same rules as with –include.
|
/
|
-skip tag * |
Tests having given tag will be skipped.
Tag can be a pattern.
|
-d dir
|
–outputdir dir |
Where to create output files.
The default is the directory where tests are run from
and the given path is considered relative
to that unless it is absolute.
|
-o file
|
–output file |
XML output file.
Given path, similarly as paths given to –log,
is relative to –outputdir
unless given as an absolute path.
Can be disabled by giving a special value NONE.
Default: output.xml
|
-l file
|
–log file |
HTML log file.
Can be disabled by giving a special value NONE.
Default: log.html
|
-r file
|
–report file |
HTML report file.
Can be disabled with NONE similarly as –log.
Default: report.html
|
-x - file
|
–xunit file |
xUnit compatible result file.
Not created unless this option is specified.
|
-b - file
|
–debugfile file |
Debug file written during execution.
Not created unless this option is specified.
|
-T - file
|
–timestampoutputs file |
When this option is used,
timestamp in a format`YYYYMMDD-hhmmss`
is added to all generated output files
between their basename and extension.
For example -T -o output.xml -r report.html -l none
creates files like output-20070503-154410.xml
and report-20070503-154410.html.
|
-x - file
|
–xunit file |
xUnit compatible result file.
Not created unless this option is specified.
|
-L level
|
–loglevel level |
HTML log file. Can be disabled by giving a special
value NONE. Default: log.html
Examples: –log mylog.html, -l NONE
|
-X
|
–exitonfailure |
Stops test execution if any test fails.
|
–exitonerror |
Stops test execution
if any error occurs when parsing
test data, importing libraries, and so on.
|
|
–console type |
How to report execution on the console.
verbose: report every suite and test (default)
dotted: only show . for passed test, s for
skipped tests, and F for failed tests
quiet: no output except for errors and warnings
none: no output whatsoever
|
|
–console type |
How to report execution on the console.
verbose: report every suite and test (default)
dotted: only show . for passed test, s for
skipped tests, and F for failed tests
quiet: no output except for errors and warnings
none: no output whatsoever
|
|
-C
|
–consolecolors
auto/on/ansi/off
|
Use colors on console output or not.
auto: use colors when output not redirected (default)
on: always use colors
ansi: like on but use ANSI colors also on Windows
off: disable colors altogether
|
Note
The long option format is case-insensitive.
Command line examples
Here are a few command-line examples to illustrate the previously explained points. For demonstration purposes, let’s assume we are working on the Robot_demo_project within the section RobProjDemo-section and the current working directory is the project folder.
# To run all test cases from all test series.
python -m robot Test_cases/*.robot
# To run all test cases from  from all_frames_capture_testseries.
python -m robot Test_cases/all_frames_capture_testseries/*.robot
# To run a single test case from all_frames_capture_testseries.
python -m robot Test_cases/all_frames_capture_testseries/test_capture_can_frames.robot
Customizing execution
Selecting test cases
When choosing specific test cases on Robot Framework, various command line options are available for effective execution control.
By test suite and test case names
Users can focus on particular test suite and test case names using the - -suite (-s) and - -test (-t) options, respectively. Both options allow multiple uses to select multiple test suites or test cases. Arguments to these options are case and space insensitive and there can be simple patterns matching multiple names.
# Select two specific test , "Test_case1" and "Test_case2" for execution.
--test  Test_case1 --test Test_case2

# Select all test cases that end with Test_case.
--test *Test_case

# Select a specific test case "Test_case" belonging to a particular suite "Test_suite".
--test Test_suite.Test_case

# Select all test suites whose names start with "Test_suite" followed by any two characters.
--suite Test_suite-??

# Select the test cases "Test_case1" and "Test_case2" within the test suite  "Test_suite".
--suite Test_suite --test Test_case1 --test Test_case2
Important
Combining –suite and –test ensures that only test cases within matching suites with corresponding names are executed.
Users have the possibility to select a test suite based on its parent suite by specifying both the parent and child suite names separated with a dot. In this case, the setup and teardown of the parent suite are executed.
# Select The "child_test_suite" under the "Parent_test_suite".
--suite Parent_test_suite.child_test_suite

# Select "Test_case1" within the "Sub_test_suite" within "Glob_test_suite".
--suite Glob_test_suite.Sub_test_suite --test Test_case1
By tag names
Users can easily choose and filter test cases based on tags using the - -include (-i) and - -exclude (-e) options. When using –include, only test cases with a matching tag are selected, and with - -exclude, test cases with a specified tag are excluded. When both options are used together, only test cases with a tag matching the inclusion criteria and not matching the exclusion criteria are considered.
# Select test cases with the "example" tag.
--include example

# Exclude test cases with the "not_ready" tag.
--exclude not_ready

# Select test cases with the "fixed" tag, and exclude test cases with "unstable" tag.
--include fixed --exclude unstable
Note
Controlling console output
When it comes to reporting test execution on the console in Robot Framework, users have various options to choose from.
Console type
The main command is –console, which sets the overall console output type. Here are the available options:
command option values |
functionality |
verbose |
It is the default option, reporting each test suite and test case individually. |
dotted |
It gives a concise representation:
“.” for passed tests
“F” for failed tests
“s” for skipped tests
“x” for tests skipped due to execution exit.
|
quiet |
It provides minimal output, showing only errors and warnings. |
none |
It suppresses all output. |
Console colors
The –consolecolors (-C) option enables users to control whether colors should be used in the console output.
command option values |
functionality |
auto (default) |
Colors are enabled when outputs are written into the console,
but not when they are redirected into a file or else where.
|
on |
Colors are enabled even when outputs are redirected.
It does not work on windows.
|
ansi |
Similar to “on” option, but it uses ansi colors on windows. |
off |
Colors are disabled entirely in console output. |
Status of test cases and suites
Status of test cases
In Robot Framework, test cases can have several statuses, including PASS, FAIL and SKIP.
PASS
Tests get the PASS status if they are executed and none of the keywords they contain fails.
FAIL
Tests can get a FAIL status primarily when a keyword contains failures, either through an exception or incorrect invocation. Other factors, such as syntax errors or an empty test, can also contribute to failures.
In suite setups, a failure results in tests being marked as failed without execution, while suite teardown failures retroactively mark test as failed.
SKIP
Skipped test are intentionally not executed during a test run. This can be useful for tests that are not yet implemented, require specific conditions, or should be temporarily excluded.
Robot Framework provides several ways to skip tests, such as using the Skip keyword within a test case or using the - -exclude option with robot to exclude tests with specific tags from execution.
Status of suites
Suite status is determined solely based on statuses of the tests it contains:
If any test has failed, suite status is FAIL.
If there are no failures but at least one test has passed, suite status is PASS.
If all tests have been skipped or there are no tests at all, suite status is SKIP.
Test results
Command line output
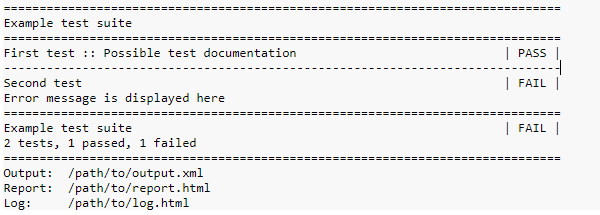
When you execute Robot Framework tests the command line directly displays a summary of the test execution results. This summary typically includes all executed test suites and test cases, along with their statuses, shown in real time.
Below is an example of the output when executing a simple test suite with only two test cases:
Generated outputs
During the execution, various output files are generated, each tied to the corresponding test results. Users can set these output files using command line options, providing the file path as an argument. To disable the creation of a specific output file, they can use the special value NONE (case-insensitive).
Output directory
By default, output files are stored in the directory where the execution starts. However, you can change it using the - -outputdir (-d) option. This option permits users to specify a path relative to the execution directory, or alternatively, an absolute path can be provided.
Regardless of how the path to an individual output file is obtained, the system ensures that the parent directory of each output file is created automatically, if it does not exist already.
Different output files
Output file
Output files contain all the test execution results in machine readable XML format and form the base for Log, report and xUnit files generation. To set the path for an output file you can use the - -output (-o) command line option with the default name as “output.xml”.
Otherwise, if users want to disable output file creation during tests, they can use - -output NONE. If no outputs are needed, they should all be explicitly disabled using - -output NONE - -report NONE - -log NONE.
# Set the path for the output file to /path/to/custom_output.xml
--output /path/to/custom_output.xml tests_directory

# Disable the creation of the output file custom_output.xml
--output  NONE tests_directory

# Disable the creation of the output file, report file and log file.
--output NONE --report NONE --log NONE tests_directory
Log file
Log files formatted in HTML, contain details about the executed test cases and present a hierarchical structure showing test suite, test case and keyword information. These log files are essential for test results investigation. By default, log files are always created with the name log.html in the directory where the execution starts, unless the value “NONE” is specified. Otherwise, the command option - -log (-l) can be used to control the location of log files.
# Configure the log file to path to "path/to/log.html"
--log path/to/log.html tests_directory

# Disable the creation of log files during tests.
--log NONE tests_directory
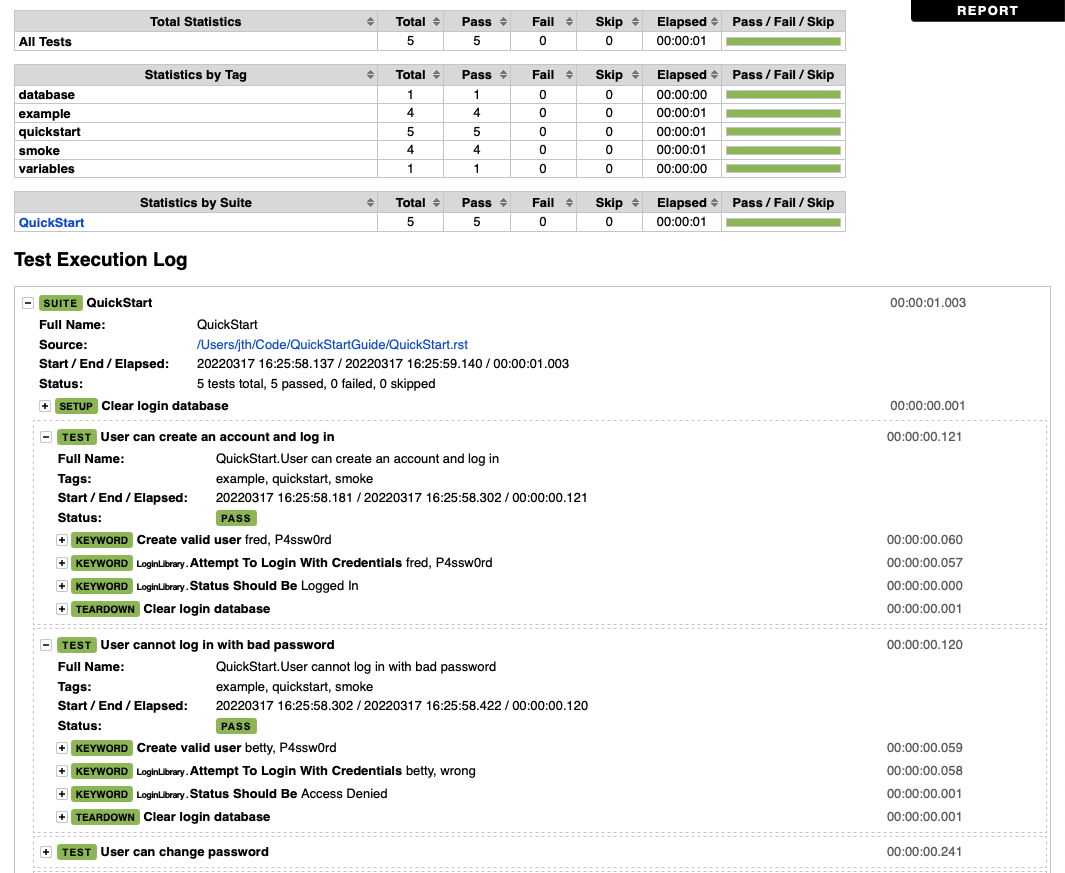
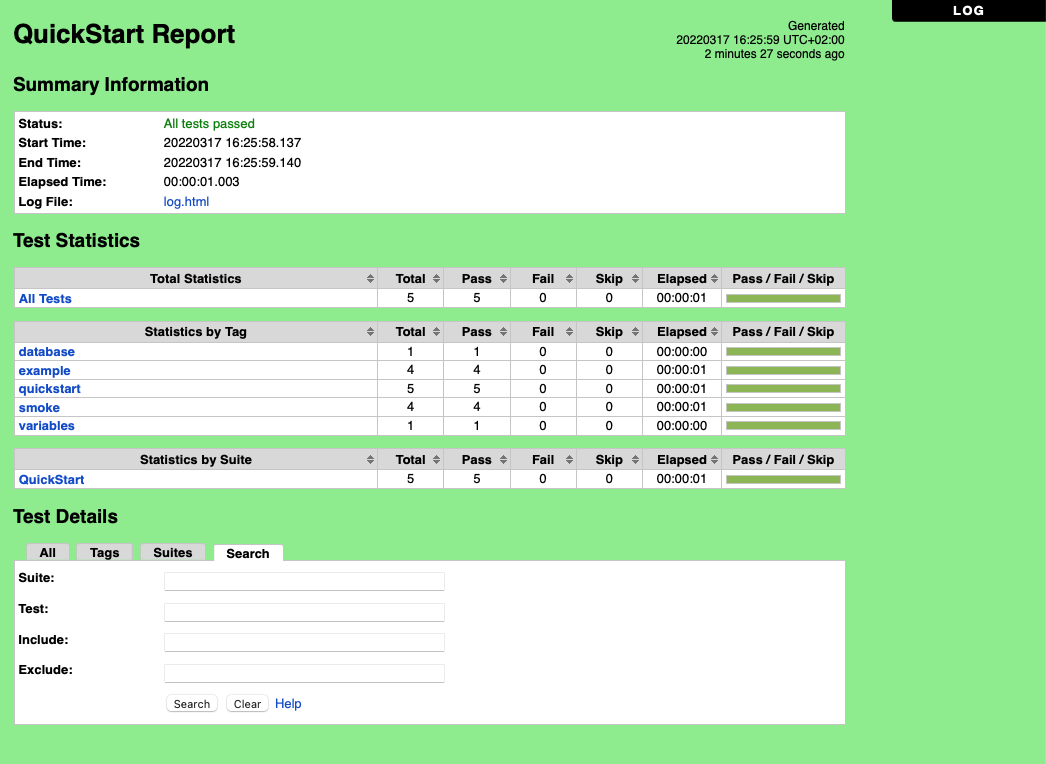
Report file
Report files, in HTML format, contain an overview of test execution results. They include statistics based on tags and test suites, as well as a list of all executed test cases. If both reports and logs are generated, the report has links to the log file for easy navigation to more details.