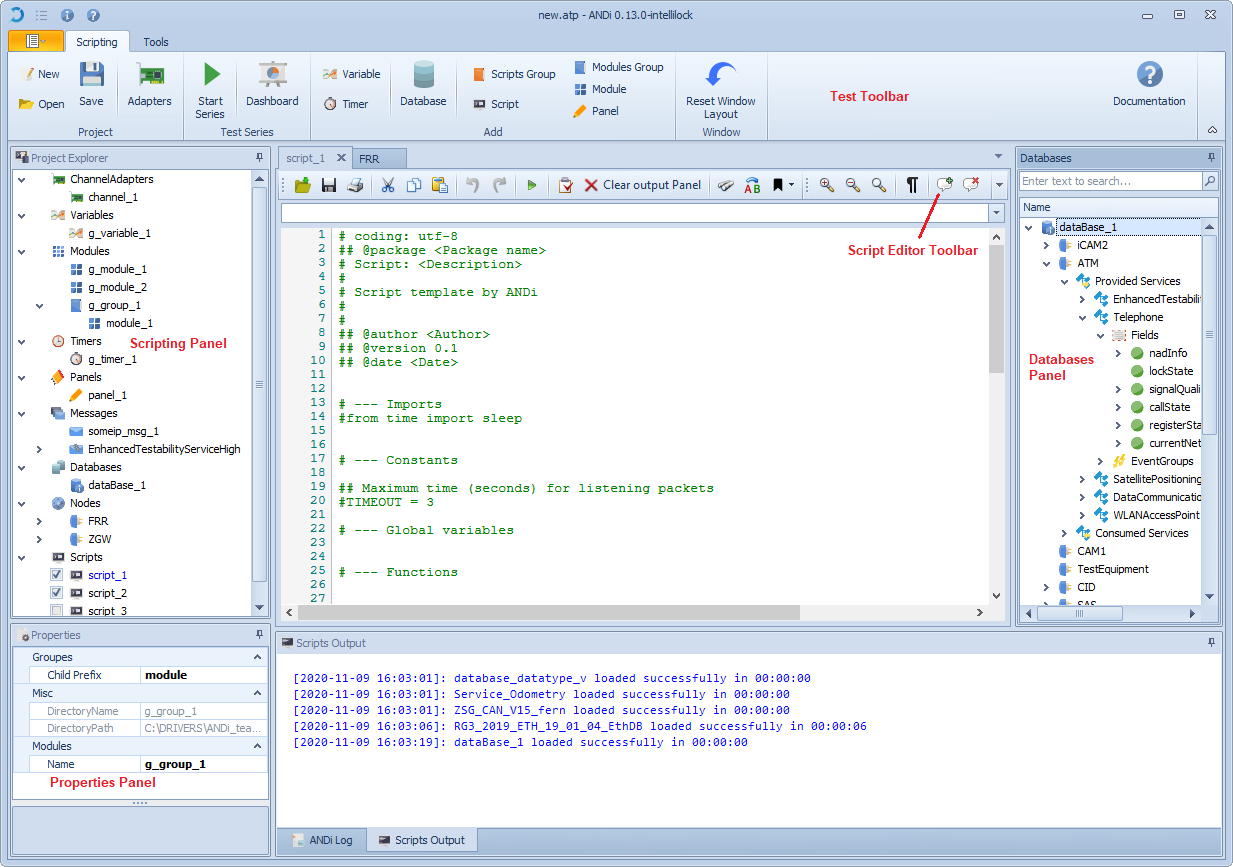
Scripting
ANDi allows the users to write scripts in IronPython using ANDi specific extensions to test and simulate ECUs. The tester has the possibility to organize the test scripts in test suites and to launch all or a part of them sequentially. A parallel execution of the scripts is also possible since a script can execute another one.
The scripting feature of ANDi uses the messages database information intensively to help the users to create, manipulate or decode the sent and received messages and to handle them live or offline (from a capture file). Third party .NET extension can be imported by the scripting engine of ANDi and provides thereby to extend the scripting scope. The results of the test scripts can be summarized in a test report and exported in several formats such as excel, html or pdf.
A standard use of ANDi would follow the next steps:
Prepare hardware setup and configure the network adapters properly by assigning the adapters to channels, to log traffic, to stimulate, etc.
Use the appropriate Fibex or messages information Database, which contains the relative information of the bus systems.
Parametrize the messages to be sent properly, for example the destination MAC and IP address assigned to the device unit under test, payload of diagnosis messages, etc.
Run scripts and check results.
Test Toolbar
The test toolbar provides controls for starting/stopping the execution of either all or a part of the test scripts in addition to some actions like adding and modifying elements of the active test project.

Save
Using this button, ANDi will save the project and the window layout (the size and position of each panel).
Start/Stop
The Start Series/Stop Series button in the test toolbar allows the user to launch all the selected scripts in the scripting panel as a Test series.
Compared with the start button in the Script_editor_toolbar, this button enables the user to launch several scripts at once (sequentially) not only the current one loaded in the script editor.
Reset Window Layout
This button allows the user to reset the position and size for each panel (Project Explorer, Properties, Script Output, ANDi Log, and Databases).
Scripting Panel
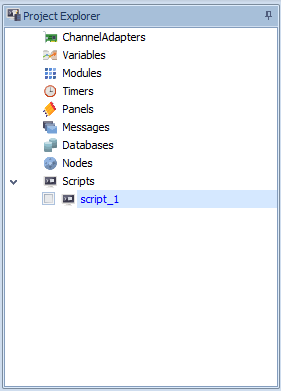
The scripting panel allows the access to the global and local objects of the test session. Global objects can be accessed within all scripts and local objects are only available in the script where they have been created. Global objects can be added using the buttons in the main menu or via right click on the name of the object group.
A Keyboard Shortcut is displayed in the scripting panel by resting the cursor:
Keyboard Shortcut
F5
Refresh
Ctrl + F
Open search box
Ctrl + P
Print text
F6
Expand all objects
F7
Collapse all objects
Properties Panel
The properties of every selected object in the scripting panel (variable, Modules, timers, messages, Databases, Nodes, Scripts) are displayed via the properties panel.
While some properties of this panel can be edited by the user, some others are fixed.
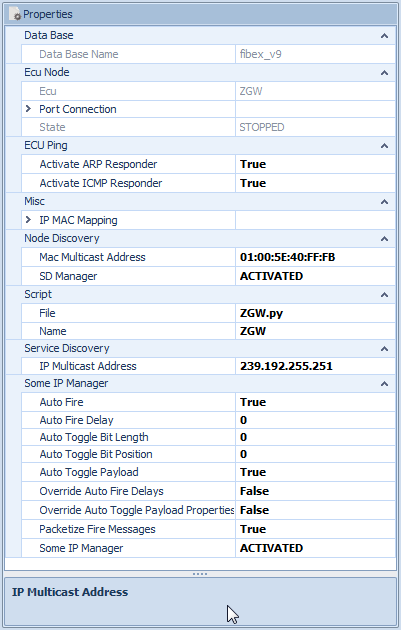
Below, the properties panel of a virtual ECU node:
1. Data Base
Data Base Name: allows the user to set the name of the object database to the simulated device.
2. Ecu Node
Port connection: contains all the communication configuration:
Port source: contains the port source which is fixed to 30490 for SOME_IP/SD communications.
Receiver: corresponds to the receiver adapter and is fixed by the user via the Adapters button in the test toolbar.
Sender: corresponds to the sender adapter and is fixed by the user via the Adapters button in the test toolbar.
Vlan tag:
Vlan
Qinq Vlan
3. Ecu Ping
Activate ARP responder: checks the status of the manager responsible for answering ping ARP messages. It can take True or False.
Activate ICMP responder: checks the Status of the icmp manager responsible for answering ping icmp messages. It can take True or False.
4. Node Discovery
Mac Multicast Address: sets the Mac Multicast Address.
SD Manager: checks if the sd manager object responsible for service discovery is activated or deactivated.
5. Script
File: file directory where is the script of the simulated Ecu.
Name: name of the script.
6. Service discovery
IP Mac Mapping: configures the IP address to the MAC address.
IP Multicast Address: sets the Ip Multicast address.
7. Some IP Manager
Auto Fire: checks if the flag activates or deactivates fields and events globally. It can take True or False.
Auto Fire Delay: auto fire cyclic delay is to be used when firing all events and fields; if override auto fire delay is set to true, and of event and field that have not auto fire delay if not.
Auto Toggle Bit Length: bit length of the data will be incremented automatically in the payload.
Auto Toggle Bit Position: bit position of data will be incremented automatically in the payload.
Auto Toggle Payload: checks if auto toggle payload when the firing all events and fields is enabled or not. It takes a boolean.
Override Auto Fire Delays: checks if override auto fire delays of events and fields is enabled or not. It takes a boolean.
Override Auto Toggle Payload Properties: checks if auto toggle payload properties when the firing all events and fields is enabled or not. It takes a boolean.
Packetize Fire Messages: checks if packetizing fire messages of events and fields that have same endpoints and auto fire delay are enabled or not.
Some IP Manager: checks if the someip manager object responsible for someip send/receive messages is activated or not.
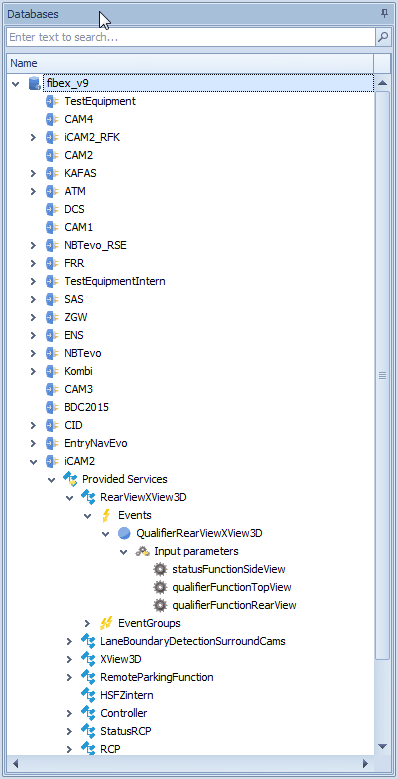
Databases panel
The databases panel shows the content of each loaded database in a tree view. Normally they are organized hierarchically, e.g. the Ethernet Fibex databases, where there are several ECUs, contain the provided and consumed services, such as fields, events... etc. All the relevant information provided for the Database is shown here, and can be accessed via the API.
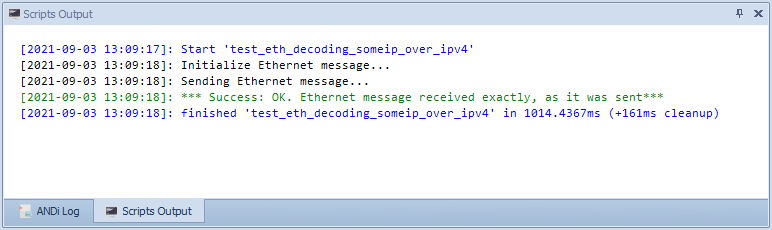
Scripts Output Panel
The Scripts Output panel displays different running status events for all active scripts as well as the output script messages.
The displayed events in the Scripts Output panel can be manipulated using the Keyboard Shortcut:
Keyboard Shortcut |
|
|---|---|
F1 |
Clear text |
Ctrl + S |
Save text |
Ctrl + C |
Copy text to the clipboard |
Ctrl + P |
Print text |
Ctrl + UP |
Increase font size |
Ctrl + DOWN |
Decrease font size |
Log Panel
The Log panel displays the different application status events of the opened session.

Keyboard Shortcuts applied to Log Panel
Keyboard Shortcut |
|
|---|---|
F1 |
Clear text |
Ctrl + S |
Save text |
Ctrl + C |
Copy text to the clipboard |
Ctrl + UP |
Increase font size |
Ctrl + DOWN |
Decrease font size |
Ctrl + MOUSE |
Scroll to zoom in and out |
Quick access
Display the quick access menu can be done using the Keyboard Shortcut:
Keyboard Shortcut |
|
|---|---|
Ctrl + Tab |
Open quick access menu |
Ctrl + UP |
Move up from one section to another |
Ctrl + DOWN |
Move down from one section to another |
Ctrl + RIGHT |
Move from project panels to scripting |
Ctrl + LEFT |
Move from project panels to scripting |
Quick access to scripting panel is displayed.

Network and Hardware Adapters
ANDi is able to use different network devices, such as Ethernet Network device, Vector hardware and Technica hardware like MediaGateway. It is necessary to map the physical network devices to channels because ANDi uses them to send and receive messages. This Mapping of channels to adapters can be done in the Adapter section, placed in Test Toolbar, which allows:
Saving or loading a required configuration in a network configuration file (*.ccf or *.yaml) extension using
Configurationbutton.Adding a new channel by editing the empty row in the bottom of the grid.
Deleting channel using the button
Deleteof the grid.Refreshing the list of interfaces using
Refresh Interfaces.Detecting if there are new adapters using
Detect Hardware.Setting the ChannelAdapters defined in the atp file to physical network adapters as defined in tmp/<project>.config , using
Auto Fix Channels. It starts with checking the adapters names, if not successful, it tries the IP(s) to make them compatible. This makes it fast to run a project from a repository through a CI system on multiple worker nodes/test benches.
Important
Loading a yaml configuration file updates the
Clustercolumn if the channel's name matches a cluster from the loaded databases.Cluster Mapping is needed for signals decoding and signal graphics filtering for CAN and LIN frames.
User can map a channel to a CAN or LIN cluster from the drop down list shown when clicking on the associated
Clustercolumn.Leaving the
Clusterempty would result in mapping to any cluster from databases with a type other than CAN, LIN and PDU.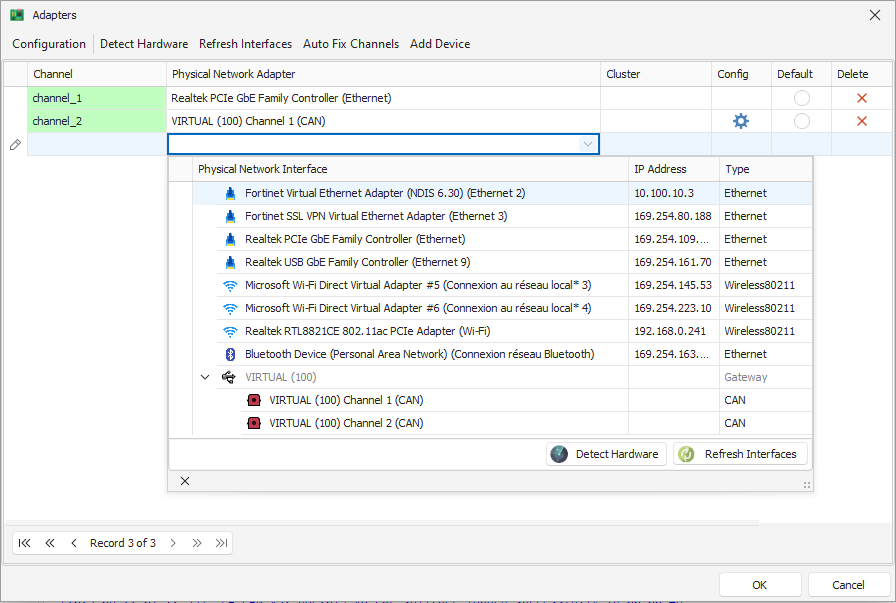
ANDi provides different functions using the Adapters, like sending burst of messages, recording traffic in PCAPs, etc. See the API for further information.
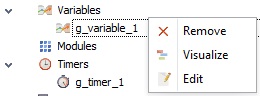
Variables
Variables are used in order to store values which can be shared and used for all the scripts. Are .Net variables, so it should be defined by their type because a default value can be also stored.
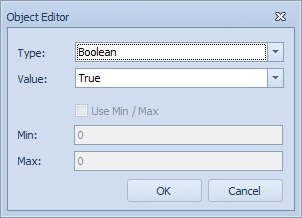
A right mouse click on the tree component Variables allows the user to add a new variable. Thus, an object editor main window is displayed. The user must fill the properties of the selected variable which can also be modified via the Properties Panel.
The most common variables supported by ANDi are of type: Numerical values, a String value, a Boolean variable, or a generic Object which can store whatever object-data type.
The API specifies how to use the variables objects in the scripts.
Modules
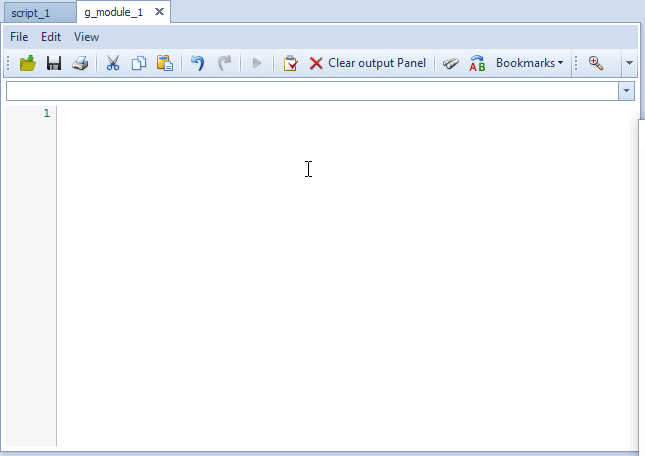
A module can define functions, classes and variables and can include runnable code. Any Python source file can be used as a module by executing an import statement in other Python source file. Modules are defined as a Python object with arbitrarily named attributes that you can bind and reference.
Normally the modules are used to reuse code, since their methods and classes can be shared and used in all the scripts if they are imported. To import modules, just use the IronPython syntax, e.g. import module_name, from module_name import method_1, etc.
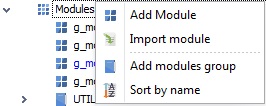
To add or load a module in the Scripting Panel the user has to make a right click on the Module object:
contrary to regular scripting, in order to use the global elements (Array, message_builder, channels...), the latter needs to be explicitly imported into the module, i.e from globals import message_builder, or in order to import everything use from globals import *.
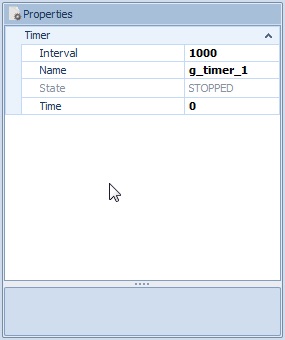
Timers
A timer object is used to raise events at the user-defined intervals or when the defined time is over. It is very useful to make synchronization between elements perform actions cyclically by combining the use of these two events. In fact, they are used to schedule the execution of a code for one or multiple times since they use callback functions.
It is possible to add a new timer using the Add Timer via the Scripting Panel or using the API.
The API specifies how to define the timer events, but it is also possible to use the properties panel to modify some attributes:
Panels
A panel object is used to create a graphical user interface with multiple controls. These controls could be configured using Properties window and must be linked to signal from database or a global variable. The values of signals/global variables in added controls can be changed interactively on these panels during the simulation.
Panel can be added by right click the Panels node in the Scripting Panel then Add Panel.
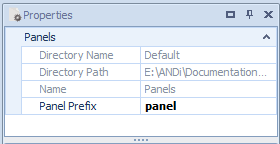
It is possible to use the properties panel to modify some attributes:
Messages
Message objects are used to create, manipulate, send and receive different kind of messages. They can be created in the Scripting Panel or using the API, and it is important to define the sender and receiver channels (network adapters).
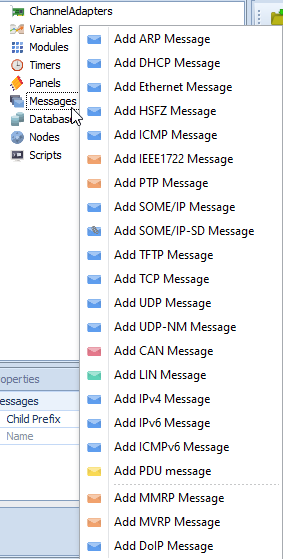
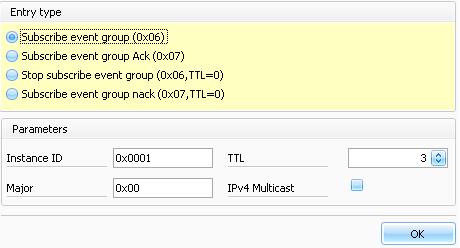
It is also possible to create messages based on their definitions in the loaded message database by dragging and dropping from the Databases Panel to the messages section of the Scripting_panel. The properties of the created message can be edited by the user via the properties panel. If the created message is a SOME/IP-SD message then the service type must be specified. In this case, an interface that allows the user to select the Entry type and set the required parameters is displayed.
In order to send and receive messages, as well as set the parametrization and use other functions, please see the API.
In Tutorials section there is a complete example for sending and receiving messages.
Databases
Databases are structured messages descriptions including the definition of exchanged signals, data types and their explicitly defined declarations for various automotive communication systems. These are used for the design, configuration, monitoring and simulation of communication on automotive networks. The database and its content is parsed by ANDi and provided in the test scripts as global objects. This approach makes it possible to write generic test cases based on database definition to avoid rewriting the test scripts every time the car message databases are updated.
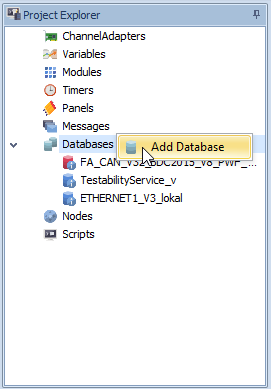
ANDi supported Fibex standard which provides a uniform, XML-based interface description for configuring the software of automotive networks. Add a new database just by a right click in the Scripting Panel under databases:
Once the database is loaded, it is possible to see its content in the tree view of the Databases Panel:

If we add a database, test project is saved automatically with all modifications that has been done before the add option of database.
If we load a database from scripting, it's not added into the project.
Rest bus simulation(RBS)
In order to allow the testing of ECUs in an early point in the development process, or to validate system behavior, it is necessary to simulate the elements that the ECUs interact with.
ANDi allows Rest Bus Simulation based on a database files, where is placed all the information necessary to simulate ECUs and other elements. To create a simulated ECU this one must be moved from the Databases Panel to the section Nodes of the Scripting Panel using drag and drop.
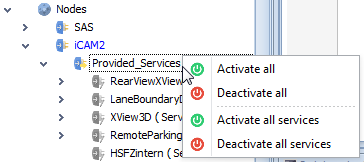
It is possible to activate or deactivate the provided and consumed services for Ethernet ECUs, as well as defining the behavior of the events by adding the code in its corresponding methods declaration. The new object can start (the simulation of the ECU communication) or stop using its context menu (right click on the ECU node) or through the appropriate functions in the scripts. See the API for further information.
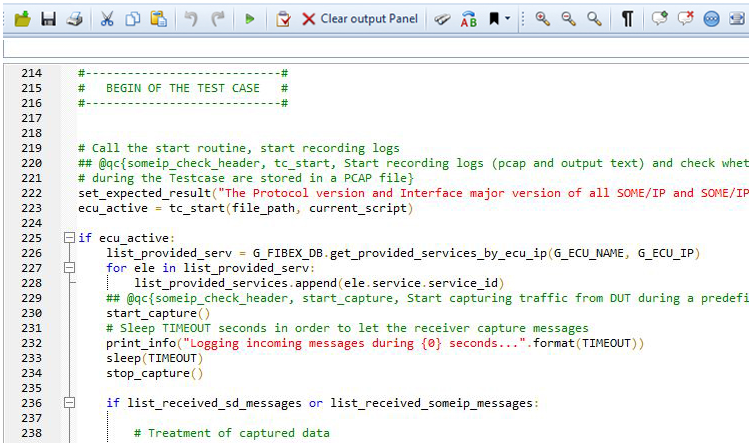
Scripts
A script is a list of instructions written in Python that is used to test or simulate a specific requirement or automated procedure. ANDi uses Ironpython compiler as a scripting language for its simplicity and wide variety of features ( see http://www.voidspace.org.uk/ironpython/presentation.html ). ANDi specific objects and functions, like messages, adapters, timers, events, etc. can be used in the scripts, and global objects as well as defined local objects, see the API for further information. The developed scripts are saved as python script (the extension *.py is used by default).
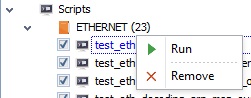
To run a script, the user has to make a right click on it in the Scripting Panel and select the
Runcontext menu item or he can also by pressRunin the Script Editor Toolbar.If more than one script wants to be executed sequentially, for example to perform test series, the user has to press the big
Runbutton of the Test Toolbar.
Every script can be opened in a new window. To do that, the user must choose Open new window in its context menu.
ANDi supports the structuring of test cases to test suites. Test suites object has only an organisational purpose.
Add a new script just by right click in the Scripting panel and write the code to create a testcase, a simulation, or any program: